


Yarn: Scheepjes Catona from Favoritgarner.se
The tablecloth in green shades is made in the following colours:
2 x 50 g 512
2 x 50 g 392
1 x 50 g 238
1 x 50 g 522
1 x 50 g 518
Hook: 3,0
UK terms used:
Ch – chain
Ss – slip stitch
St – stitch
Ch-sp – chain space
Dc – double crochet
Tr – treble crochet
Htr – half treble crochet
Pic – picot – Ch 3, ss in in the third st from hook.
Tips: The first tr on each round is a standing one, or ss + ch 3.
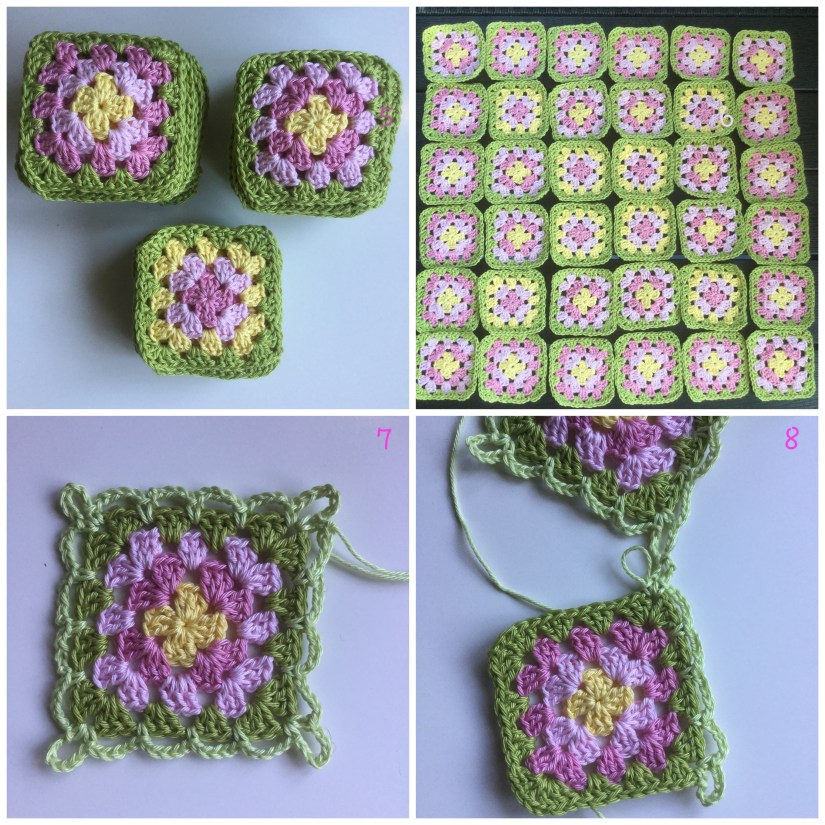
Start by making 36 granny squares. I made 8 squares with yellow on round 3, 12 squares with light pink on round 3, and 16 squares with dark pink on round 3 (see photo 5 below).
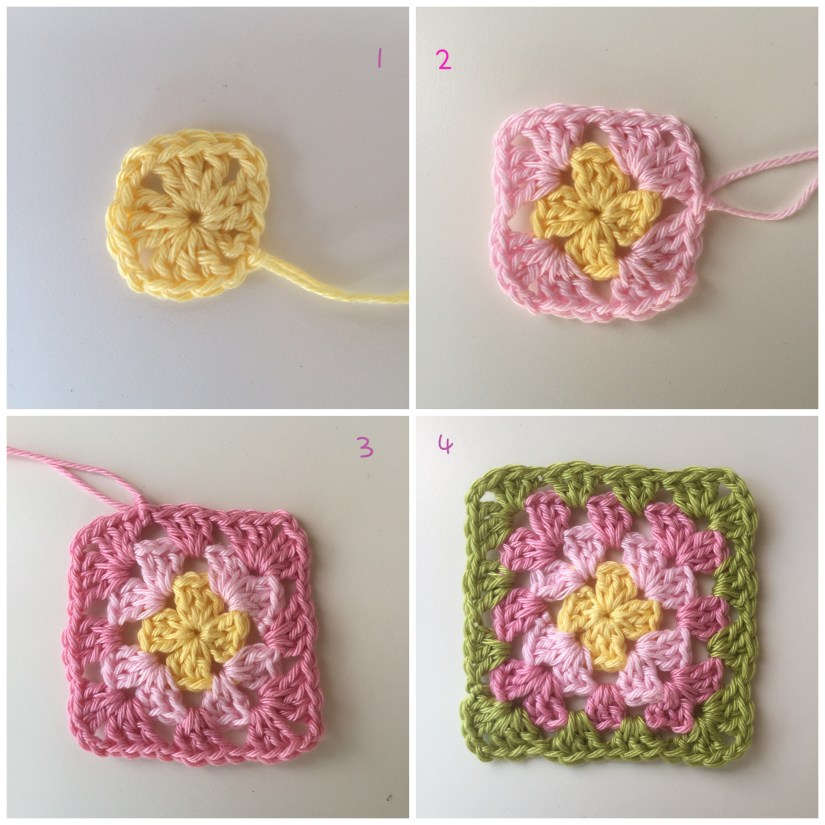
Make a magic loop, or ch 4 and ss in the first st.
Round 1: Ch 3 (acts as first tr) 2 tr, ch 2, 3 tr, ch 2, 3 tr, ch 2, 3 tr, ch 2, join to initial ch 3 with a ss. Fasten off. You now have 12 tr and 4 ch-sp.
Round 2: *3 tr + ch 2 + 3 tr in ch-sp, ch 1, skip 3 tr, repeat * around and join to initial tr with a ss. Fasten off. You now have 24 tr, four ch2-sp and four ch1-sp.
Round 3: *3 tr + ch 2 + 3 tr in ch2-sp, ch 1, skip 3 tr, 3 tr in ch1-sp, ch 1, skip 3 tr, repeat * around and join to initial tr with a ss. Fasten off. You now have 36 tr, four ch2-sp and eight ch1-sp.
Round 4: *3 tr + ch 2 + 3 tr in ch2-sp, skip 3 tr, 3 tr in ch1-sp, skip 3 tr, 3 tr in ch1-sp, skip 3 tr, repeat * around and join to initial tr with a ss. Fasten off and weave in the ends. You now have 48 tr and four ch-sp.
 Joining squares:
Lay all your squares as you want them to be joined, and take a photo. It will make it much easier for you to join the squares in the right order (Photo 6).
I start with the square in the top right corner (photo 6).
Only on your first square you make a round like this:
Dc + ch + dc in ch2-sp, *ch 5, skip 3 tr, 1 dc between tr-groups, ch 5, 3 tr, 1 dc between tr-groups, ch 5, skip 3 tr, f1 dc between tr-groups, ch 5,skip 3 tr, repeat * around and join to initial dc with a ss. Fasten off. (Photo 7)
Square nr 2, the one to the left of square number one on photo 6 (will be joined to square 1 on one side):
Dc + ch 7 + dc in ch2-sp, (ch 5, skip 3 tr, dc between tr-groups) 3 times, ch 5, skip 3 tr, dc in ch2-sp, ch 3, ss in ch7-sp on square 1, ch 3, dc in ch2-sp (photo 8) (ch 2, ss in next ch5-sp on square 1 photo 9, ch 2, skip 3 tr on square 2, dc between tr-groups photo 10) 3 times, ch 2, ss in ch5-sp on square 1, ch 2, dc in ch2-sp on square 2, ch 3, ss in ch7-sp on square 1, ch 3, dc in ch2-sp on square 2 photo 11, (ch 5, skip 3 tr, dc between tr-groups) 3 times, ch 5, dc + ch 7 + dc in ch2-sp, (ch 5, skip 3 tr, dc between tr-groups) 3 times, ch 5, ss in first dc. Fasten off. Photo 12.
Join the rest of the squares in the same row, in the same way. Your new square is always nr 2 and your previous square is always nr 1. Photo 13. Now the top row on photo 6 is finished.

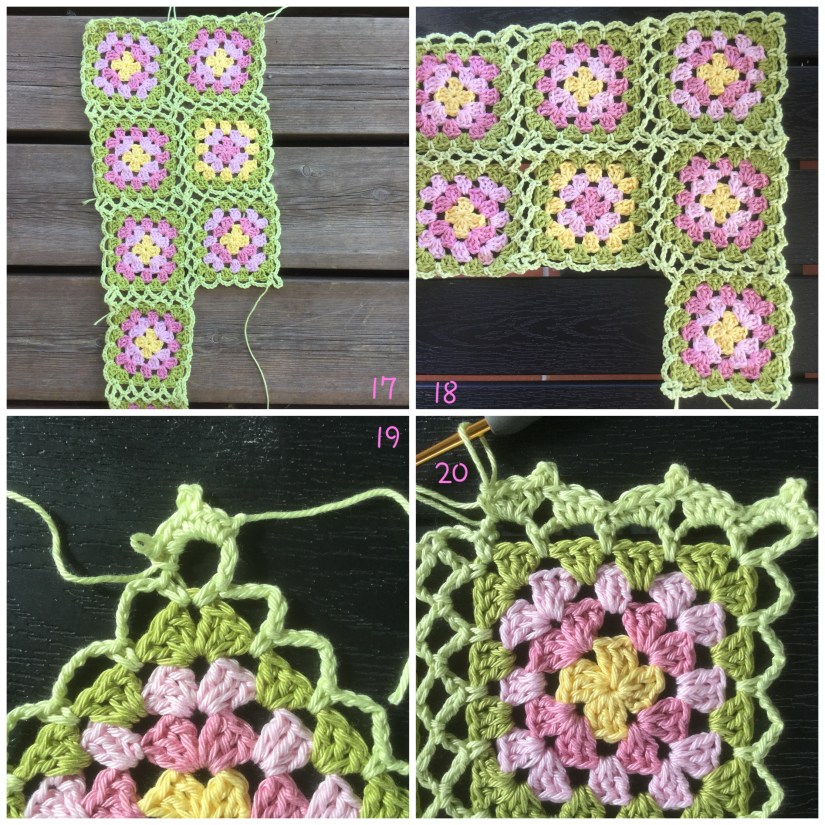
 When you start on row 2, all your squares except for the first one, will be joined on two sides, (photo 14 – 17). You start joining the square that is right under your first square in photo 6. Photo 18 shows your third row, joined the same way as row 2.
Edging:
3 dc + pic + 3 dc in ch7-sp photo 19 , *(dc + htr+ 2 tr in next ch5-sp, pic, 2 tr + htr + dc in next ch5-sp) 2 times photo 20, dc + htr + tr in ch7-sp photo 21, tr + pic + tr between the two ch7-sp photo 22, tr + htr + dc in next ch7-sp photo 23, repeat * around, but in ch7-sp in the corners, you make 3 dc + pic + 3 dc. Join to initial dc with a ss.
 Weave in all the ends and block it for best result!
