
Copyright All rights reserved Ellinor Widéen @frostvirka
My planner is 21,5 cm x 16,5 cm
Hook: 3,0 and 3,5
Yarn : Sheepjes Catona, leftover yarn in different colours for the front and one skein for the insides of the planner. You can find all the lovely colours at Favoritgarner with worldwide shipping
UK terms used:
Ch – chain
Dc – double crochet
Htr – Half treble
lgtr – long treble crochet. You make this the same way as the tr, except it will be worked into a row two rows back, instead of previous row, keep your yarn loose.
ss – slip stitch
tr – treble crochet
With hook 3,5, chain 78. If your planner is bigger or smaller than mine, you might need to chain more or less than I. Your chains should cover your planner. The number of ch always have to be possible to divide by 4 + ch 2. (76 can be divided by 4 + ch 2 = 78).
Hook: 3,0
Row 1: 1 dc in the second ch from hook, 1 dc in each ch across. You now have 76 dc. Turn.
Row 2: Ch 3(acts as first tr), *1 tr in each of the following 3 dc, ch 1, skip one dc, repeat* until you have 4 dc left, 1 tr in each of these 4 dc. You now have 4 tr in the beginning and in the end of this row and 17 groups of 3 tr in between. Turn.
Row 3: Ch 3(acts as first tr), *1 tr in each of the following 3 dc, ch 1 , skip ch-1space, repeat *and finish with 1 tr in each of the last 4 tr. You now have 4 tr in the beginning and in the end of this row and 17 groups of 3 tr in between. Fasten off. Turn.
Row 4: New colour, standing tr in first tr (or ss in the first tr, ch 3), 1 tr in the next tr,* ch 1, skip 1 tr, tr in next tr, lgtr in ch-1space from row 2, 1 tr in next tr, repeat* but after your last lgtr + tr, ch 1, skip one tr, 1 tr in each of the last two tr. Turn.
Row 5: Ch 3 (acts as first tr ), 1 tr in next tr, ch 1, *skip ch1-space, 1 tr in each of the following 3 tr, ch 1 , repeat* but the row ends with 1 tr in each of the last 2 tr. Fasten off. Turn.
Row 6: New colour, standing tr in first tr (or ss in the first tr, ch 3), 1 tr in next tr, *lgtr in ch-1space from row 4, 1 tr in next tr, ch 1, skip 1 tr, tr in next tr, repeat* but after your last lgtr, 1 tr in each of the last two tr. Turn.
Row 7: Ch 3 (acts as first tr ), *1 tr in each of the following 3 tr, ch 1, skip ch-1space, repeat* until you have 4 tr left, 1 tr in each of these 4 tr. Fasten off. Turn.

Repeat row 4 – 7 six times.
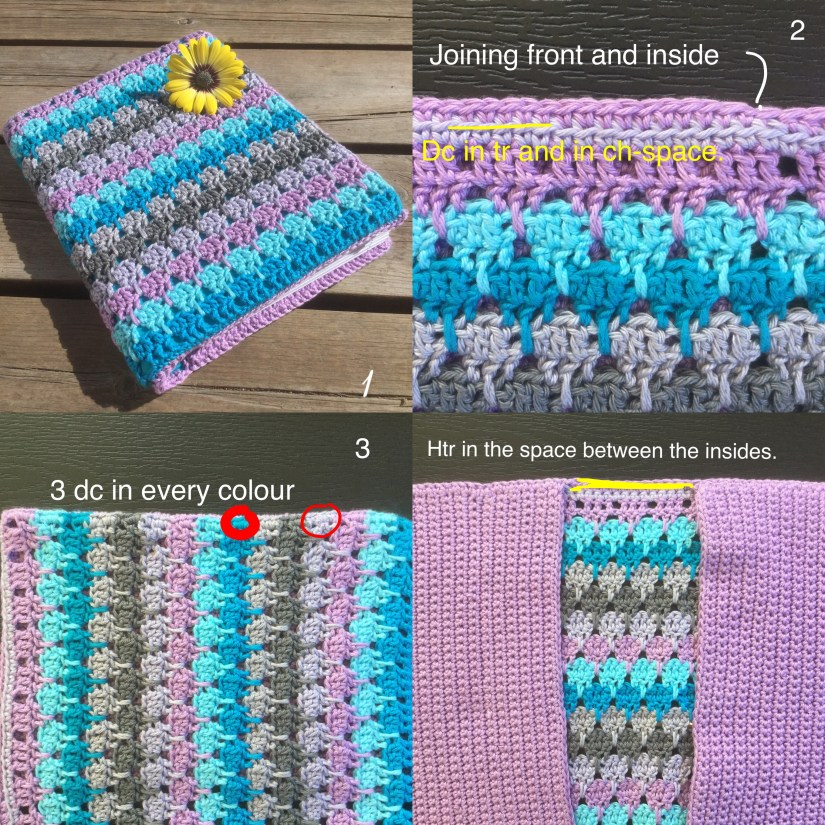
Crochet one row with only dc, from the right side, after your last row made (which is a row 7). See pic 2 below, yellow text.
Fasten off and weave in all the ends.
The inside of the cover
Row 1: Start on the shortest side (from the right side) Make 3 dc in each colour , except in beginning and in the end, where I made 4 dc. I changed colours in this row so that my dc would have the same colour as the larks foot. You now have 47 dc. Fasten off.
Row 2: New colour. This row is also made from the right side. This row is worked in the beck loop only. Standing dc in the first dc, (or ss in first dc, ch 1), dc in each of the following dc. You have 47 dc. Turn.
Start all of the following rows with ch 1, (a turning ch, not counted as a dc). Continue to make rows using only dc until it covers most part of the inside of your planner. I made 42 rows. Fasten off.
Crochet an inside for the other shortest side the same way.
Joining inside and front:
Join from right side. Dc through the back loop of the front’s dc and through the cover’s inside. See pic 2 above, white text. I made 32 dc. Join inside and front on the other 3 sides. See pic below:

When all the parts are joined, make htr in the space between the insides. See pic 4 above. Do this at the top and at the bottom. Fasten off and weave in all the ends. Put on your new cover!
