
Yarn: Tilda Cotton Eco from Favoritgarner.se
3 x 25 g skeins of 282
4 x 25 g skeins of 248
3 x 25 g skeins of 204
3 x 25 g skeins of 249
1 x 25 g skein of 286
Hook: 3,0
Size: 69 x 53 cm
UK terms:
Dc – double crochet
Ch – chain
Ch-sp – chain space
Ss – slip stitch
Tr – treble crochet
Puff – *Yarn over, insert hook in stitch, yarn over and pull up a loop, repeat * until you have 9 loops on hook. Yarn over and pull through 8 loops on hook. Yarn over and pull through remaining loops.
Fppuff – Front post puff stitch
*Yarn over, insert your hook from front to back around your tr from previous row , yarn over and pull up a loop, repeat * until you have 9 loops on hook. Yarn over and pull through 8 loop on hook. Yarn over and pull through remaining loops.
Dc2tog – Insert the hook into next stitch ), and draw a loop through. Repeat this step into the next stitch, (3 loops on hook). Yarn over and draw through all 3 loops on hook.
tr3tog- 3 treble crochet together. Yarn over, insert hook in next st, pull the yarn through 2 loops, yarn over, insert the hook in the same st, pull the yarn through 2 loops, yarn over, insert the hook in the same st, pull the yarn through 2 loops, yarn over and and pull the yarn through all 4 loops.
Pic – picot Ch 3, ss in ch 1.
If you have any questions about the pattern, you can always contact me at frostvirka@gmail.com and I will try to answer as fast as I can.
Bubble square
It is worked in rows back and forth.
Make 8 squares using 204, 8 squares in 282, 7 in 248 and 7 in 249.
Ch 21.
Row 1
Dc in second ch from hook, 1 dc in each ch to the end. Turn. (20 dc)
Row 2
Ch 3 (acts as first tr) 1 tr in each st to the end.Turn. (20 tr)
Row 3
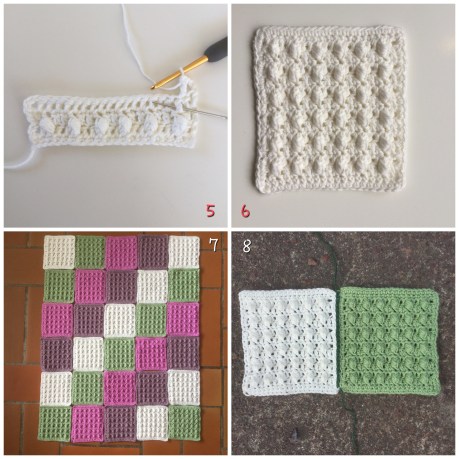
Ch 3 (acts as first tr), tr in next st,* fppuff around next tr (photo 1 and 2), 1 tr in each of the following 2 tr, repeat* to the end. Turn (6 fppuff, 14 tr). Photo 3 and 4.
Repeat row 2 and 3 (photo 5) until you have 6 rows of fppuffs, turn to the wrong side, ch 1, 1 dc in each st (20 dc). Turn, ch 1. Make a round of dc around your square, from the right side. 80 dc. Join to initial dc with a ss. Fasten off and weave in the ends. Photo 6.

Assembly Colour 286
Place your squares according to photo 7. You can either crochet or sew them together. I have joined my squares using the flat zipper method. I started in the top left corner and joined a white and a green square (photo 8). Join each row until you have 6 rows of squares (photo 9). Join your 6 rows.

Edging:
Round 1 Colour 286
1 dc in the back loop of each st, but in the corners you make 2 dc in the same st. NOTICE Between the squares I have made dc2tog in the last st of a square and in the first st of next square. It makes the edging more straight and neat. Photo 10.
Round 2 Colour 248
Start in the first dc2tog on a short side:
*tr3tog + ch 2 + tr3tog in dc2tog =a flower, photo 12, ch 2 ( skip 1 st, dc in next st, ch 2) 9 times, repeat * 3 times, skip 1 st, tr3tog in next st, ch 3, tr3tog in next st ( a corner on your blanket ), ch 2, skip 1 st, dc in next st, ch 2 etc.
You make the long sides in the same way (repeat*) but make 10 dc and 10 ch-sp between each flower on the long sides, instead of 9 as on the short sides. Join to initial tr3tog with a ss.
Notice that on this round you might need to skip 2 st instead of 1 st before or after a flower to get the right amount of ch-sp.
Round 3 Colour 248
Ss to ch-sp, * puff in ch-sp (photo 13), ch 4, skip tr3tog and ch-sp, dc in dc, (dc in ch-sp, dc in dc) 8 times, ch 4, skip ch-sp + tr3tog, repeat * around, but on the long sides you repeat the parenthesis 9 times instead of 8. Join to initial puff with a ss. Fasten off.

Round 4 Colour 286
Start in a corner;
*Dc in ch-sp from round 2 + ch-sp from round 3 right before a corner (photo 14), ch 2, dc in ch-sp from round 3, ch 2, dc + pic + dc in puff, ch 2, dc in next ch-sp (photo 14), ch 2, dc in ch-sp from round 2 + ch-sp from round 3, 1 dc in the back loop of each of the following dc, **dc in ch-sp from round 2, ch 2, dc in ch-sp on round 3, ch 2, skip puff, dc in ch-sp on round 3, ch 2, dc in ch-sp on round 2 photo 15, 1 dc in the back loop of each of the following dc, repeat ** to the next corner, repeat * around and join to initial dc with a ss. Fasten off and weave in all the ends.


- This pattern and the photos are all mine. You may use them for private use, but they cannot be copied or published on another page.
- If you post a picture of something you have made from any of my patterns, I would be really happy if you link and refer to my blog, and to me as the designer.
- I would really be happy if you #frostvirka and #ascentoflilacsblanket so that I can see all your lovely versions of my blanket.
xxx Frostvirka/Ellinor
